Make Your Droid Eris Faster & Smoother, and Increase Battery Life
I got my Droid Eris in November of 2009 (the month it came out) and since then, the Droid Incredible, Droid X, and Droid 2 have been released. Comparing stock firmwares and their average performances, the Droid Eris is last on that list. In addition, Android 2.2 has been officially released for all the Droids except the Eris!
However, with much research, reading, and testing, I have been able to increase performance, stability, and battery life on my Droid Eris by running a ported version of Android 2.2 and some custom apps and tweaks.
Warning
I must remind you though that making unofficial software and firmware changes to your handset violates the warranty of your phone; therefore, if anything goes wrong during this process or in the future, you will be unable to return the phone for a replacement unless you are able to return the phone back to its original, factory settings. I am not responsible for what you choose to do with your phone.
Root is vital
Before you follow a majority of the following steps, I must stress that rooting your phone plays an important role. Rooting your phone gives you the ability to make unofficial software and firmware changes to your phone, giving you the ability to hack your phone to improve stability and performance. Get directions on how to root your Eris by reading Run Android 2.2 (Froyo) on Your Droid Eris.
You need Froyo (Android 2.2)
Back in May of 2010, Kaos started working on porting Froyo over to the Droid Eris. It started off rough, but now at version 34, FroyoEris runs as smooth as butter! FroyoEris is not the only option out there. If you look around, you’ll see there are several choices available; however, I personally recommend FroyoEris. Now that I’m running Froyo on my Eris, I refuse to go back to the stock 2.1 firmware! Instructions on how to run Froyo on your Eris are available. (Keep in mind that you need root to do this).
Increase performance, stability, and battery life
This section is what I’m sure you’ve all been waiting for. With the tweaks I’ve made to my Eris, it runs smoother than cutting butter with a hot knife; smoother than a baby’s butt; as smooth as silk (however you want to say it!).
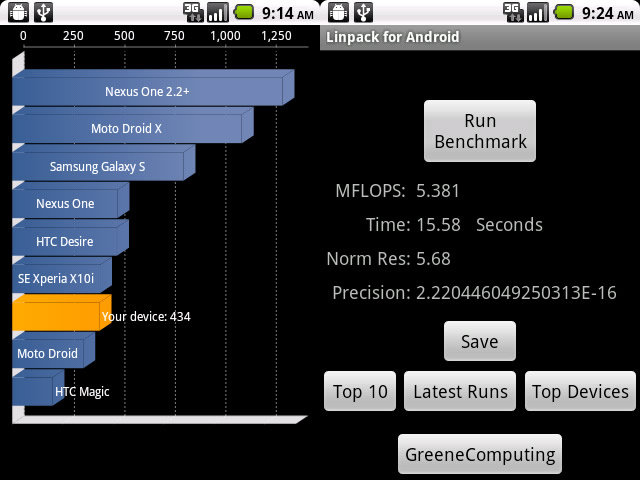
Above is my Quadrant and Linpack stats when my phone is at normal, every-day settings. I am not a huge fan of overclocking my phone for higher stats and numbers; it’s a phone for Pete’s sake! Overclocking your phone will give you higher performance numbers, but you’re at risk of your phone running more unstable than it should.
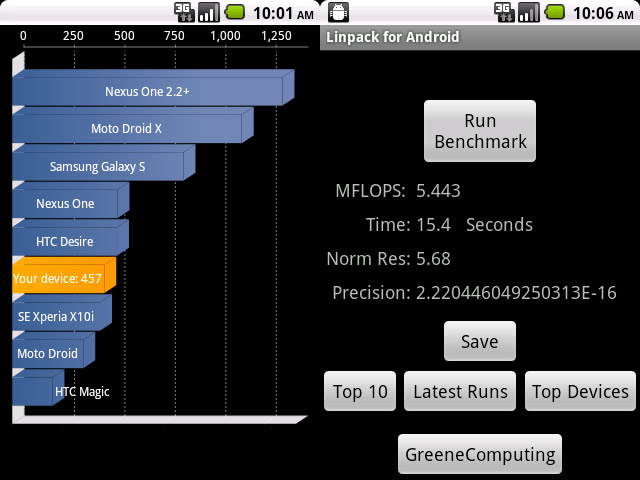
For those who are interested, the numbers above are just an example of the kind of performance you can get with some overclocking (SetCPU was set at 806400). However, I’m more interested in my phone’s stability and not raw performance.
Prerequisites
Before I get started, I hope those of you interested in this have gone through and already know the prerequisites of downloading and installing custom apps.
You should also know how to flash custom .zip files. If you do not know how, please read Run Android 2.2 (Froyo) on Your Droid Eris. Again, this article is to help you understand how to flash a file.
As a note, I will never, I say again, never, suggest or promote something I have not tested, used, or performed myself personally. I am very careful to suggest things, and I make sure I, myself, have tried it before I do a write-up on it. I am a firm believer on promoting something after doing it myself.
Do NOT unzip or tamper with the zip files and make sure to download the zip files linked on this site. Flashing a tampered or incorrect zip file may cause errors or even bricking your phone.
As a final note, you do not have to follow every step. Only follow the steps you are comfortable with.
Install custom apps
SetCPU
SetCPU is a wonderful application that allows you to tweak your phone’s CPU and to set and gauge your phone’s performance based on different circumstances (default, plugged in, screen off, etc.) It works on most, if not all rooted Android 1.5/1.6/2.0/2.1/2.2 devices.
- Download and install SetCPU at.
- Open up SetCPU.
- Select Autodetect Speeds Recommended. (If SuperUser prompts, asking you for permission, click Allow)
This is when it gets a little touchy. Settings and tweaks for SetCPU seems to tend to vary based on the user and his device. I can give you pointers on how to get started and some general settings, but in the end, you may have to tweak your settings to make it work for you (depending on how picky you are about your phone’s performance). Please keep in mind that numbers may vary so stay as close as possible when following these directions.
Warning: Clocking your CPU too high or too low may cause your phone to freeze, become instable, or restart. Please use caution when adjusting your CPU settings (I suggest not going higher than 710000). In addition, the SetCPU widget is known to cause problems for people so if you are experiencing problems or lag, remove it for better performance.
- Main tab
Max - Around 710000, Min - 122880, Scaling - Ondemand - Profiles tab
- Check enable.
- Add and save profiles for the following conditions:
- Condition - Charging/Full, Max - Around 710000, Min - Around 680000, Scaling - Performance
- Condition - Screen Off, Max - 480000, Min - 122880, Scaling - Ondemand
- If your phone seems to freeze up or randomly restart, clock down your Max setting to something lower.
- Once you have your settings right, go back to the Main Tab of SetCPU and check Set on Boot.
That should get you started with SetCPU! Plug your phone in and start using your phone a bit. I saw a difference in my phone’s performance immediately. Remember, setting may vary by user. My guide is to be used to help you get started in the right direction; it is not the de facto.
AutoKiller
AutoKiller, by AndRS Studio, is another must-have app that configures your phone’s internal memory management routines, making your phone run smoother. It also has a full-powered process manager as well. AutoKiller should work on most rooted Android devices.
From various responses and reads, it seems that AutoKiller is a preference or annoyance, depending on how people use their phones. When you are running a few apps, AutoKiller may kill some processes; therefore, if you are one that likes to run multiple apps all the time, setting the preset to “Moderate” or “Optimum” may be better than setting it to “Strict.” Again, I suggest testing before taking my final word for it since I don’t use my phone like you do.
- Download and install AutoKiller from either the Android Market by searching for “AutoKiller” or at the AutoKiller official website.
- Open up AutoKiller (If SuperUser prompts, asking you for permission, click Allow)
- You can test the settings for yourself, but I would suggest setting your Presets to
StrictOptimum. - Menu > Settings and make sure Apply settings on boot is checked.
The beauty of AutoKiller is that it runs in the background and once you set your preset, you do not have to open AutoKiller again.
LauncherPro
By default, Froyo’s launcher is Launcher2 and if you flashed KaosFroyo, it should be ADW Launcher. From my experience and even a lot of reaching, LauncherPro is a highly customizable launcher, and it’s also fast! From the number of homescreens and dock settings to custom icons, there’s a lot you can do with LauncherPro.
If you are running KaosFroyo and want to remove ADW, download adw-b-gone.zip and flash the zip using the recovery menu.
- Download and install LauncherPro from the Android Market.
- Press the Home button, and select Launcher Pro as your default launcher and click the check mark when it asks you to save it as your default home/launcher.
- To get the LauncherPro’s settings, click Menu > Preferences.
GPS Status
Root is not required. Having difficulty with your GPS or does it take an abnormally long time to lock your position? I’ve had this problem after flashing a dozen or more custom ROMs on my phone. GPS Status will allow you to reset the GPS and download GPS assistance data, which should speed up your GPS for a few days.
- Download and install GPS Status from the Android Market.
- Open GPS Status, Menu > Settings.
- Go to “GPS Sensors” and click Manage A-GPS State.
- Select both Reset and then Download.
- Put your phone down on a flat, level surface and select Calibrate roll and pitch. This reset and calibrates your accelerometer.
You should notice that the time it takes your GPS to lock your position in Google Maps is lower if it was taking longer than normal before.
DialerOne
Root is not required. If you’re running a Senseless ROM (like KaosFroyo) and you absolutely hate the default Dialer, join the club! With 900+ numbers on my phone, scrolling through or searching for numbers is just another two or three steps I would love to avoid since the default dialer does not have smart-dial. Dialer One is your answer! With speed dial and smart dial capabilities, it makes dialing a piece of cake.
Wireless Tether
If you want to be able to turn your Eris into a wireless router (for your iPad, Kindle, laptop, etc.), you need an app called Wireless Tether. Wireless Tether turns your Eris into a wireless hotspot!
- Download and install Wireless Tether from the Android Market.
- Open Wireless Tether.
- Menu > Setup > Change SSID (This is the name of your wireless signal).
- Menu > Setup > Enable WiFi-Encryption > Check.
- Menu > Setup > Change Passphrase (This will password protect your wireless signal).
- Press the green wireless logo to start tethering!
Recalibrate your battery
Recalibrating your battery may increase the longevity of your battery, especially if you’ve been experiencing issues with battery life. This can be done with the recovery menu.
- Charge your battery to 100%.
- Power off your device, start it back up into Recovery mode (Volume Up or Down + Power On).
- Select Wipe and choose battery stats with your trackball.
- Shut off your device.
- Unplug your phone and power it on.
- Leave your phone unplugged and fully drain the battery. (Do not plug it back in. Make sure it’s dead by trying to turn it back on)
- Leaving the phone off, plug the phone back in and let it fully charge without interruption.
You should see an increase in battery life after doing this simple recalibration of your battery. Thanks to Hungry Man.
Upgrade your radio
Warning: As a warning, flashing your radio, if done incorrectly, is one of the easiest ways to brick your phone. Please take caution and take this as a warning. Please proceed at your will and with caution. I am not responsible with what you choose to do with your phone.
Upgrading your radio may help improve the signal strength of your device. If anything, it will give you the lastest version of the released radio. To check the version of your radio, go to Settings > About Phone. The radio version is the number underneath Baseband version.
The latest version of the Eris radio is the July 2010 - 2.42.01.04.27 radio.
- Download the July 2010 radio.
- Put the .zip file on your sdcard at the root (/sdcard/)
- Power off your device, start it back up in Recovery mode (Volume Up or Down + Power On) and flash the zip.
- Reboot your device.
Upgrade your kernel
Upgrading your kernel may help improve the performance and stability of your device. To check the version of your kernel, go to Settings > About Phone. The kernel version will be listed under Kernel version.
Though there are a few kernels out there, the one I recommend is the [GPL] 2.6.29.6 CFS Kernel compiled by Conap and Decad3nce, both developers at XDA-Developers. The latest version is the 2.6.29.6 version 5. I personally feel my phone performs better after installing this kernel.
As a side note, some of the latest ROMs (including KaosFroyo v38) already come preloaded with the CFS kernel.
- Download the latest version of the CFS Kernel.
- Latest version is V8 (http://forum.xda-developers.com/showthread.php?t=774211)
- Put the .zip file on your sdcard at the root (/sdcard/)
- Power off your device, start it back up in Recovery mode (Volume Up or Down + Power On) and flash the zip.
- Reboot your device.
Well-known bugs
Camera bug
Some have been experiencing the camera bug when various versions of KaosFroyo (i.e. v35, v35-1). There is a temporary fix that should work by turning auto focus to manual focus or turning it off.
- Open the camera.
- Press the settings icon > Focus mode and set to Off or Touch.
3D gallery bug
Many people are also having issues with the 3D gallery or just find it slow. My suggestion is to download and flash the 2D gallery.
- Download the 2D gallery .zip file.
- Make sure to copy the file to the root of your /SDCARD/.
- Reboot your phone into recovery mode and flash 2DGallery.zip.
Tweak your settings
There are many options available on your phone that will help speed it up and improve it’s performance a bit.
Disable window transitions
- Settings > Display > Animation > No animations.
- Applications > Spare Parts > Window animations > Off.
- Applications > Spare Parts > Transition animations > Off.
- Applications > Spare Parts > Fancy input animations > Uncheck.
Change VM Heap Size
Settings > CyanogenMod Settings > Performance settings > VM heap size > 32m
If you use LauncherPro…
Go to Menu > Preferences >
- Advanced Settings > High quality scrolling > Uncheck.
- Advanced Settings > Use 3D drawer > Uncheck.
Enjoy
If you followed most, if not all, of these suggestions, your phone should be performing better than before. Although I am tempted to upgrade to a newer phone, I keep telling myself I am going to hold out for the Verizon iPhone (if it ever comes out). Until then, I can manage with my Eris running Froyo!
As I continually come across new apps to improve it’s performance, stability, and battery life, I will keep sharing them with you. If you have a Droid Eris and have suggestions on apps, or you tested all or some of these methods, I would love to hear from you. Tell us about it by commenting below!